
 ENG
ENG
 English
 中文简体
中文简体 русский
 Français
 Español
 عربى
عربى
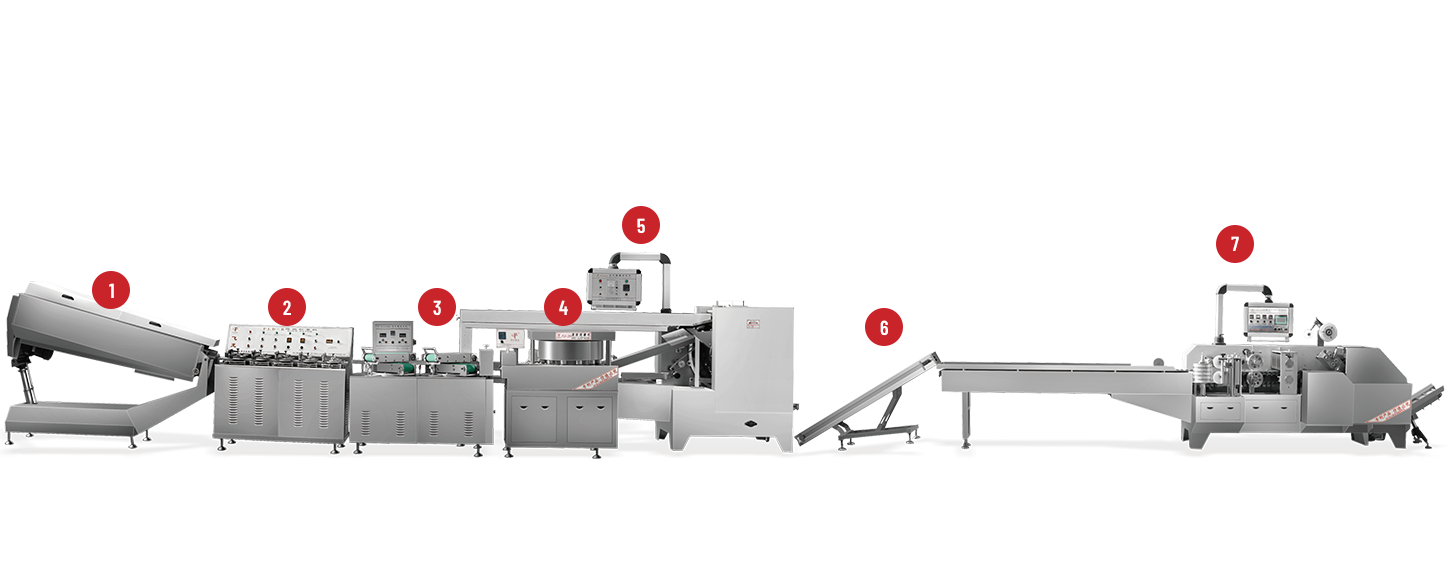
Welcome to continue reading How Do Lollipop Machines Make Different Shapes of Lollipops
Comparative Summary Table
Below is a consolidated view comparing all four methods across key aspects:
| Method | Detail Level | Production Speed (units/hour) | Changeover Speed | Ideal Run Size | Typical Mold Material |
|---|---|---|---|---|---|
| Static (Gravity) | Moderate | ≈ 300 | (<2 min/plate) | Small → Medium (< 10 000/week) | Aluminum, Silicone |
| Rotary (Carousel) | Very High | ≈ 1 000 | (5–10 min) | Medium → Large (10 000–50 000/week) | Hard Anodized Aluminum |
| Compression (Plunger) | Moderate | ≈ 200 | (Alignment sensitive) | Small → Medium (< 10 000/week) | Hardened Steel, Aluminum |
| Injection (Industrial) | Extremely High | ≈ 3 000 | (Hours) | Very Large (> 50 000/week) | Tool Steel (H13), P20 Steel |
Designing a New Shape: Step-by-Step Workflow
Regardless of method, creating a new lollipop shape follows this general progression:
Concept & Sketch
Brainstorm desired shape, size, and any branding elements.
Consider physical constraints (thin sections may break; deep cavities risk air pockets).
3D Modeling (CAD)
Build a digital model (SolidWorks, Fusion 360, or AutoCAD).
Add a draft angle (1–3°) and specify where the stick will be inserted (usually a central boss).
Prototype Mold
For quick proofs-of-concept, use a 3D-printed mold (food-safe resin) or silicone.
Check for proper fill behavior (no trapped air, consistent wall thickness).
Final Mold Fabrication
CNC Milling (Aluminum/Steel): Common for static or rotary plates.
EDM (Electrical Discharge Machining): Needed for extreme precision—tiny logos or deep relief.
Multi-Part Mold Construction: Side slides, inserts, or collapsible cores for undercuts.
Machine Integration & Parameter Tuning
Attach mold to the machine's platen, carousel, or compression station.
Adjust:
Sugar Temperature (°C/°F)
Fill Pressure/Speed (for injection or rotary nozzles)
Cooling Time/Flow
Ejector Timing
Test Runs
Produce a small batch (dozens) to verify shape fidelity, wall thickness, and stick alignment.
Inspect for defects:
Air bubbles around fine details
Flash or burrs along edges
Inconsistent stick depth (must be centered and secure)
First-Article Approval
Measure critical dimensions with calipers (± 0.5 mm typical tolerance).
Conduct a pull test on the stick (ensure it doesn't pop out under moderate force).
Perform a quality assessment (appearance, color consistency).
Full-Scale Production
Monitor reject rate (ideal: < 1 %).
Schedule regular mold cleaning (every 2–4 hours in high-volume runs).
Plan for mold refurbishment every 50 000–100 000 cycles (re-polish or re-machine surfaces if wear appears).
Typical Shape Examples & Recommended Methods
| Shape | Method | Reasoning/Notes |
|---|---|---|
| Classic Round/Disc | Static or Rotary | Simple hemispherical cavity or shallow disc. Static is easiest; rotary helps if volume > 5 000/week. |
| Heart, Star, Flower | Static or Rotary | Moderate detail (draft angles sufficient). Rotary achieves faster cycles once demand is high. |
| Corporate Logo (Flat Relief) | Compression or Injection | Compression gives crisp, shallow relief at low volumes; injection needed for thousands with multi-color. |
| Character/Cartoon Figure | Rotary or Injection | Under-cut features require side cores—rotary with sliding inserts or multi-slide injection molds. |
| 3D Animal/Plastic Figurine | Injection | Complex 3D shape with deep undercuts and side details; injection mold’s sliding cores or collapsible core. |
Visual Comparison: Production Speed Chart
Above, you saw a bar chart comparing the approximate production speeds of the four methods:
Static (Gravity-Fill): ~ 300 units/hour
Rotary (Carousel): ~ 1 000 units/hour
Compression (Plunger): ~ 200 units/hour
Injection (Industrial): ~ 3 000 units/hour
This helps illustrate why, for very large runs or highly detailed designs, rotating or injection systems are favored, whereas small businesses or seasonal artisans often choose static or compression setups.
Key Takeaways
Choose Method by Volume & Detail:
Small, simple orders → Static molding (lowest cost, quick changeover).
Medium volumes with moderate detail → Rotary molding (good balance of speed and detail).
Flat logos or thin layered pops → Compression molding (precise thickness, crisp relief).
Very large runs or highly intricate/colored shapes → Injection molding (highest throughput, multi-layer capabilities).
Draft Angles & Ejection Are Crucial:
Always design molds with a slight taper so candy releases cleanly.
Incorporate reliable ejector pins, spring-loaded sticks, or side slides for undercut areas.
Material Selection Matters:
Aluminum/Steel molds → Faster cooling, longer life, ideal for high-volume.
Silicone or 3D-printed molds → Good for rapid prototyping or very limited runs but slower throughput.
Maintain & Inspect Regularly:
Clean sugar residue every few hours to prevent buildup (“burn backs”).
Check molds for wear (rust, scratches) after tens of thousands of cycles, and re-machine or replace as needed.
Balance Cost vs. Flexibility:
Static and compression presses cost less but have lower throughput and detail.
Rotary and injection molds require higher capital but pay off when volume or branding complexity increases.
With these principles and method comparisons in mind, manufacturers—whether small-batch candy makers or large confectionery factories—can decide how best to produce eye-catching, perfectly shaped lollipops for any occasion.


 +86-(0)515-8465666
 +86-(0)515-85566996
 +86-138 1559 9708
 flyloong@flyloongcn.com
 Home
Home