
 ENG
ENG
 English
 中文简体
中文简体 русский
 Français
 Español
 عربى
عربى
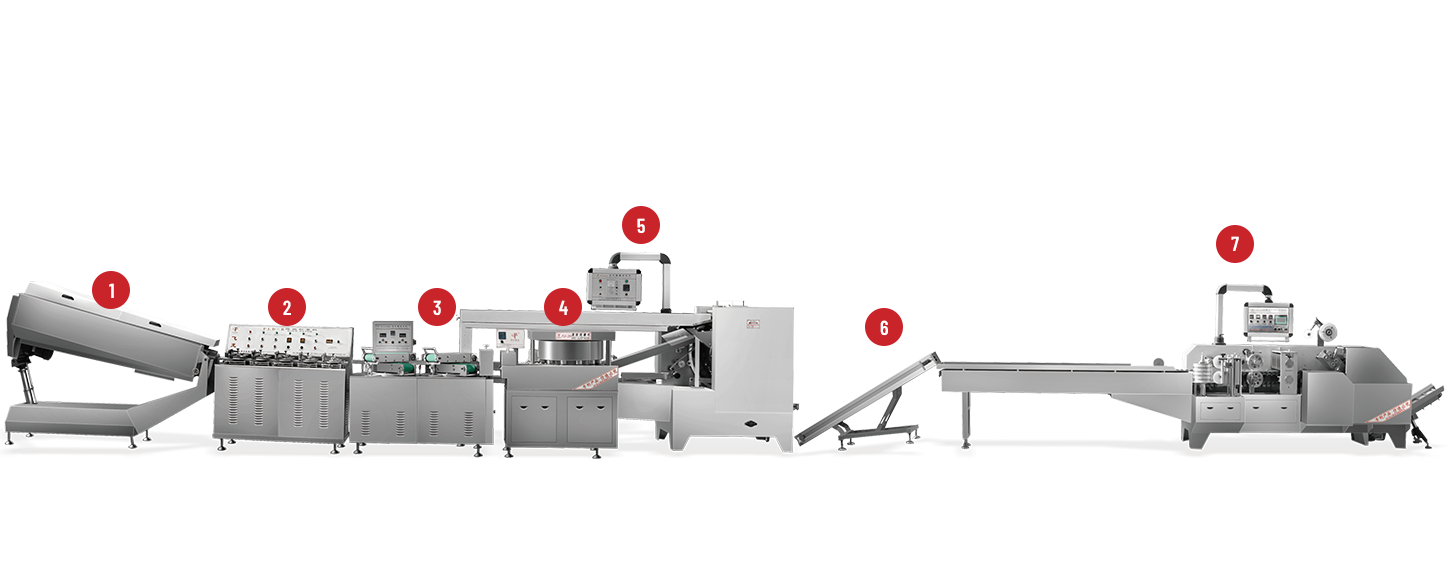


Operating a Spoon Candy Machine allows confectionery makers to create attractive spoon-shaped treats efficiently. During regular production, however, various situations can arise that affect consistency, speed, or product appearance. Recognizing these common challenges early and applying straightforward solutions keeps operations running smoothly and helps maintain customer satisfaction.
1. Material Adhesion on Contact Surfaces
This situation occurs when the sugar mixture clings too strongly to nozzles, channels, or forming areas.
Typical contributing factors
- Temperature settings outside the ideal range
- Buildup of caramelized particles from earlier runs
- Viscosity of the batch being higher than expected
- Insufficient release coating or cleaning between cycles
Effective approaches
Before starting production, wipe down all surfaces that come into contact with the mixture using warm water and a gentle brush. Adjust the heating level slightly downward if adhesion persists across multiple batches. Consider applying a thin layer of food-grade release agent (where permitted) on critical areas. Slowing the material feed rate by a small increment often reduces sticking noticeably. After each shift, perform a more thorough flush of all pathways.
2. Irregular or Distorted Final Shapes
Products emerge with inconsistent thickness, crooked edges, or incomplete spoon outlines.
Frequent reasons
- Slight shifting of molding components during extended use
- Variations in pressure applied during forming
- Wear developing on guide rails or alignment pins
- Uneven cooling right after shaping
Practical solutions
Stop the machine and visually check alignment of all forming sections — realign gently using basic hand tools when needed. Verify that pressure remains steady throughout the cycle; small fluctuations can be smoothed by adjusting regulator settings. Lubricate sliding and rotating elements every few days to prevent binding. Allow shaped items a brief stabilization period before removal to reduce deformation caused by handling while still warm.
3. Unusual Sounds During Operation
Grinding, rattling, squeaking, or knocking noises appear after some hours of use.
Common origins
- Fasteners that have gradually loosened
- Small debris or sugar crystals lodged in moving areas
- Bearings or bushings running dry
- Minor contact between parts that should remain separate
Steps to resolve
Pause production and identify where the sound originates by listening carefully while the machine runs at low speed. Tighten any accessible screws, bolts, and clamps. Remove accumulated particles using compressed air or a soft brush. Apply appropriate food-safe lubricant to pivot points and bearings. If the noise continues after these steps, schedule inspection of internal wear components.
4. Excessive Temperature Rise
The equipment becomes noticeably hotter than normal during normal operation.
Main causes
- Extended continuous running without pauses
- Dust and sugar powder obstructing cooling vents
- Ambient room temperature higher than usual
- Cooling fans operating at reduced efficiency
Resolution methods
Introduce short breaks every 45–60 minutes to allow heat dissipation. Clean all ventilation openings at the beginning of each shift. Position the machine in an area with adequate airflow and avoid placing it near heat sources. Check that fans spin freely and remove any buildup around blades. Monitoring temperature display helps catch rising trends early.
5. Blockages in Material Delivery Lines
Flow stops or becomes intermittent because pathways become partially or fully obstructed.
Usual culprits
- Sugar hardening inside tubes during brief downtimes
- Small foreign particles entering the hopper
- Crystallization occurring when temperature drops unexpectedly
Remedies
Flush lines with warm (not boiling) water after noticing slowdowns. Fit fine mesh screens at material entry points to catch impurities. Maintain consistent temperature during idle periods rather than allowing complete cooling. Keep a long flexible cleaning brush nearby for quick manual clearing when needed.
6. Inconsistent Operating Speed
The machine runs too slowly at times or suddenly accelerates without input changes.
Possible sources
- Fluctuations in electrical supply voltage
- Temporary control board confusion
- Drive belt tension becoming loose over time
- Motor struggling due to partial overload
How to correct
Use a voltage stabilizer if your location experiences power variations. Perform a full restart of the control system after noticing speed changes. Check and readjust belt tension according to the recommended range. Reduce batch size temporarily if motor strain appears to be the issue.
7. Small Leaks Around Connection Points
Drops or seepage appear near joints, seals, or fittings.
Typical causes
- Seals losing flexibility after long service
- Gaskets installed with uneven pressure
- Thermal expansion creating tiny gaps during heating cycles
Solutions
Replace any visibly hardened or cracked seals during routine maintenance. When reassembling, tighten fittings evenly in a cross pattern. Consider upgrading to higher-temperature-rated sealing materials if leaks recur frequently in hot conditions.
| Observed Problem | Primary Suspect(s) | Immediate Action to Try | Follow-up Check |
|---|---|---|---|
| Strong sticking | Residue + temperature | Thorough cleaning + slight temp reduction | Observe next 3 batches |
| Uneven spoon shapes | Misalignment or pressure variation | Realign forming parts | Measure 10 consecutive pieces |
| Rattling or grinding noise | Loose hardware or dry bearings | Tighten and lubricate | Run 20 minutes and listen again |
| Overheating | Blocked vents or no breaks | Clean vents + add pauses | Monitor temperature trend |
| Intermittent flow | Hardened sugar in lines | Warm flush + inlet screen | Check flow consistency |
| Speed changes unexpectedly | Power fluctuation or belt slip | Stabilize power + tension check | Observe over full shift |
| Minor leakage | Aged seals | Replace seals + even tightening | Inspect after next heating cycle |
Recommended Daily & Weekly Care Routine
- Before starting — quick visual scan of all visible moving parts
- After each batch — wipe external surfaces and flush visible channels
- Every 3–4 hours — apply light lubrication to pivot points
- Daily — verify temperature stays within normal operating window
- Daily — listen for changes in sound pattern
- Weekly — check belt tension and seal condition
- Weekly — deep clean internal pathways and vents
- Bi-weekly — inspect alignment of forming and guide components
Following these habits consistently prevents the majority of interruptions and extends the smooth operation period between major services.
When equipment functions reliably, makers gain freedom to focus on recipe development, color variations, flavor combinations, and packaging creativity — elements that truly differentiate products in the market.
Many confectionery producers discover that addressing these everyday situations systematically transforms production from stressful to enjoyable. Stable machinery also allows more consistent output quality, which customers notice and appreciate.
For additional guidance, real-world user experiences, photos of common fixes, maintenance checklists, and ideas for small upgrades, many makers turn to specialized confectionery equipment resources online. Visiting dedicated websites often reveals practical solutions that fit various workshop sizes and production volumes.
Hopefully this more comprehensive overview helps you handle challenges more confidently and keeps your spoon treat production flowing smoothly day after day.


 +86-(0)515-8465666
 +86-(0)515-85566996
 +86-138 1559 9708
 flyloong@flyloongcn.com
 Home
Home